> ## Documentation Index
> Fetch the complete documentation index at: https://studio-docs.prem.io/llms.txt
> Use this file to discover all available pages before exploring further.
# Get Started with Projects
> Create your first AI development project and learn the complete workflow from dataset creation to model evaluation.
# Creating Your First Project
Projects provide a guided, end-to-end workflow for AI model development. This guide walks you through creating a complete project from start to finish.
## Step 1: General Setup
From the main dashboard, click **Projects** in the left sidebar, then click **+ Create Project**.
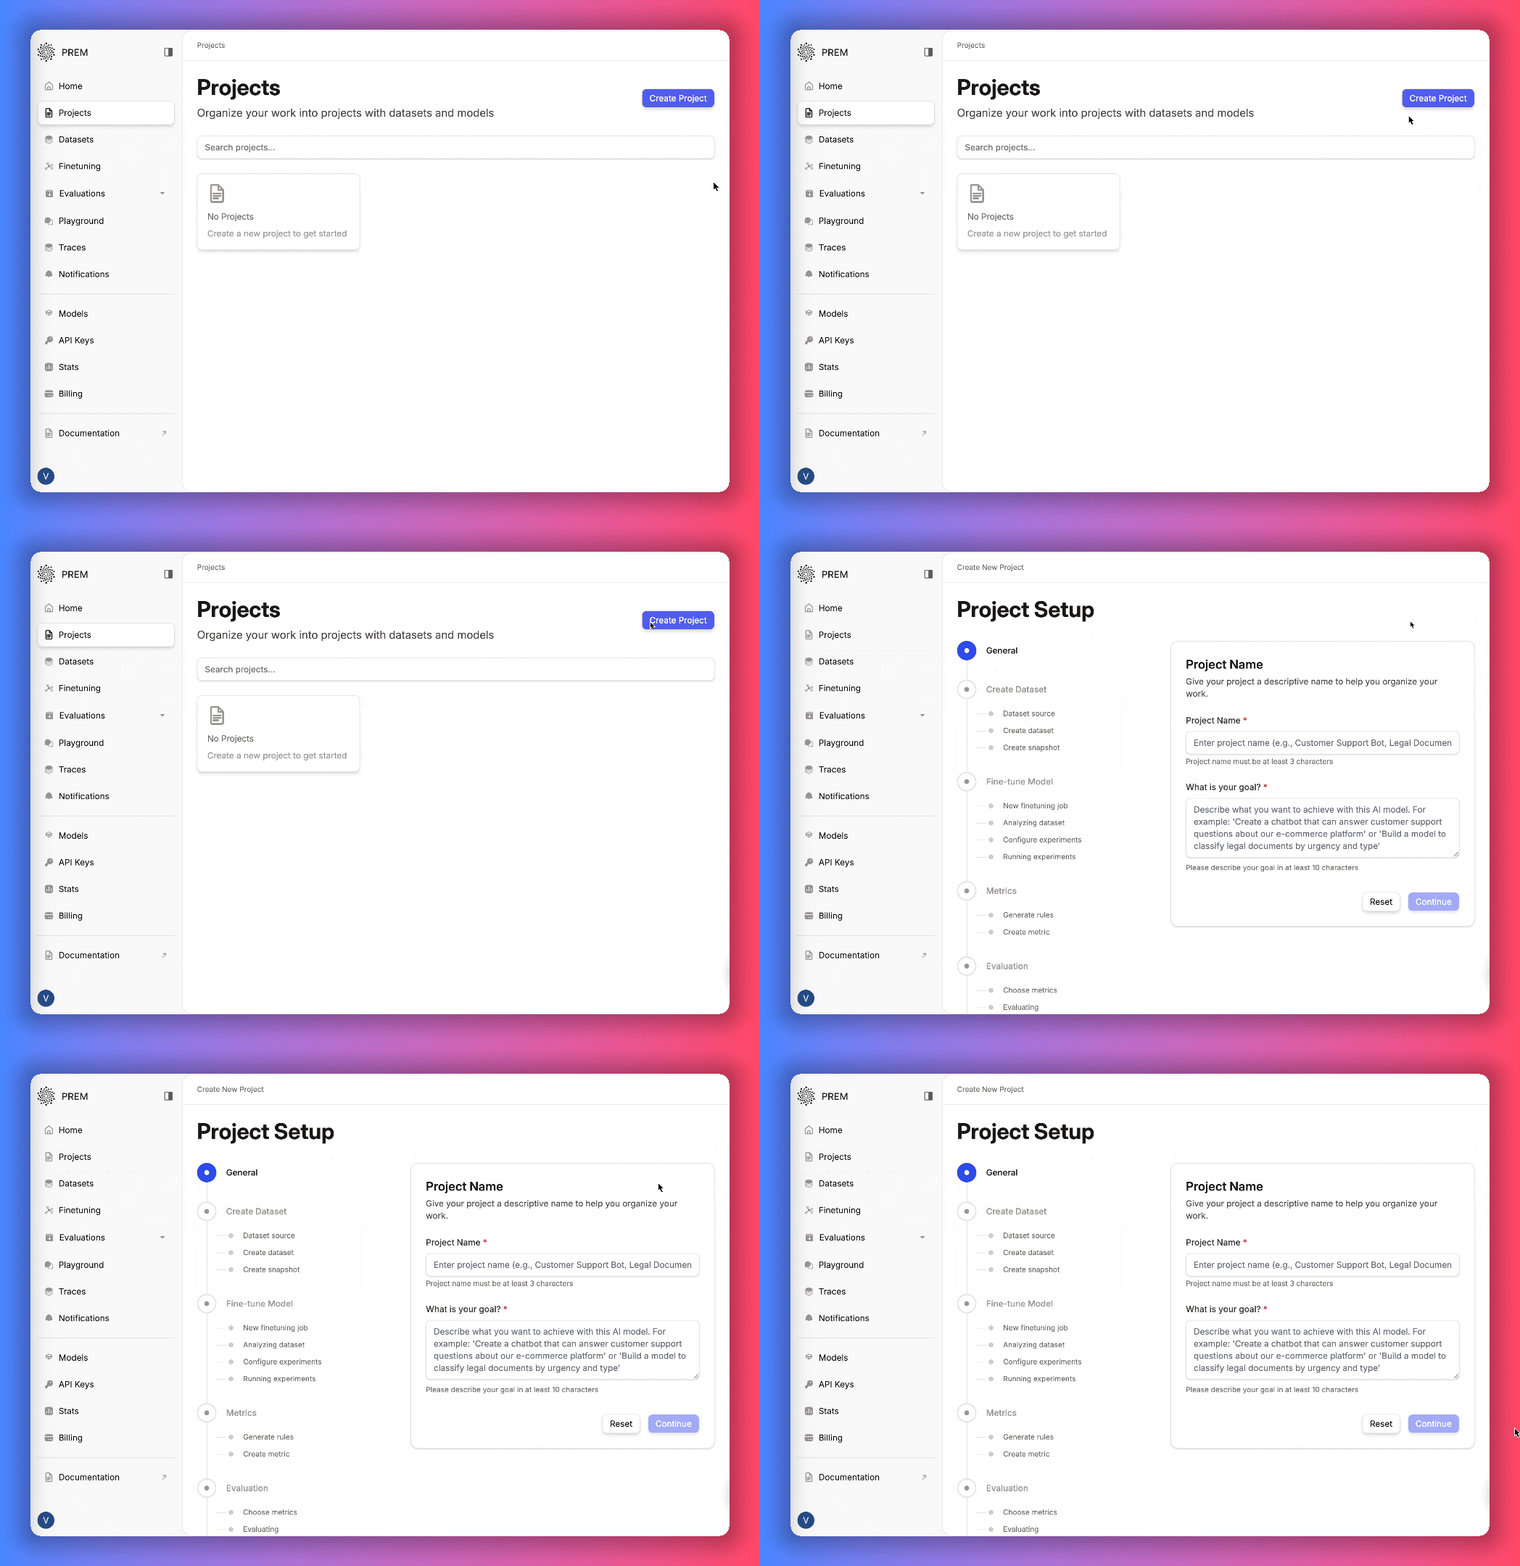 **Project Name**: Choose a descriptive name that reflects your use case
**Project Goals**: Add context about your project goals
**Follow-up Questions**: Answer some questions about your project
## Step 2: Create and Handle Dataset
You have **two paths** for dataset creation. Choose the one that fits your situation:
### Path A: Upload Existing JSONL Dataset
Upload your existing dataset in JSONL format.
* **Dataset Name**: Enter a descriptive name
* **Upload File**: Select your properly formatted JSONL file
* **Validation**: The system will automatically validate your dataset format
Need help with JSONL format? See our [Datasets Overview](/datasets/overview) for detailed formatting requirements.
### Path B: Generate Synthetic Dataset
Generate synthetic dataset from your content (PDFs, web pages, youtube videos)
Select your input sources for synthetic dataset generation:
* **Files**: PDF, DOCX, TXT, HTML, PPTX
* **YouTube Videos**: Individual videos or playlists
* **Web URLs**: Website content extraction
* **Mixed Sources**: Combine multiple input types
**QA Pairs per Source**: Set how many question-answer pairs to generate from each input
**Rules & Constraints**: Define generation requirements
```text theme={null}
- Focus on technical accuracy
- Use domain-specific terminology
- Maintain consistent formatting
- Generate questions of varying complexity
```
**Question Format**: Guide question structure
```text theme={null}
Summarize the blog post titles {blog_title} in 5 bullet points.
{blog_post}
```
**Answer Format**: Define expected answer style
```text theme={null}
{bullet_list}
```
You can also provide QA Examples to better steer the synthetic data generation.
**Creativity Level**: Adjust generation diversity (0-100)
For structured outputs (like JSON extraction), set creativity to 0. For conversational models, use 30-50.
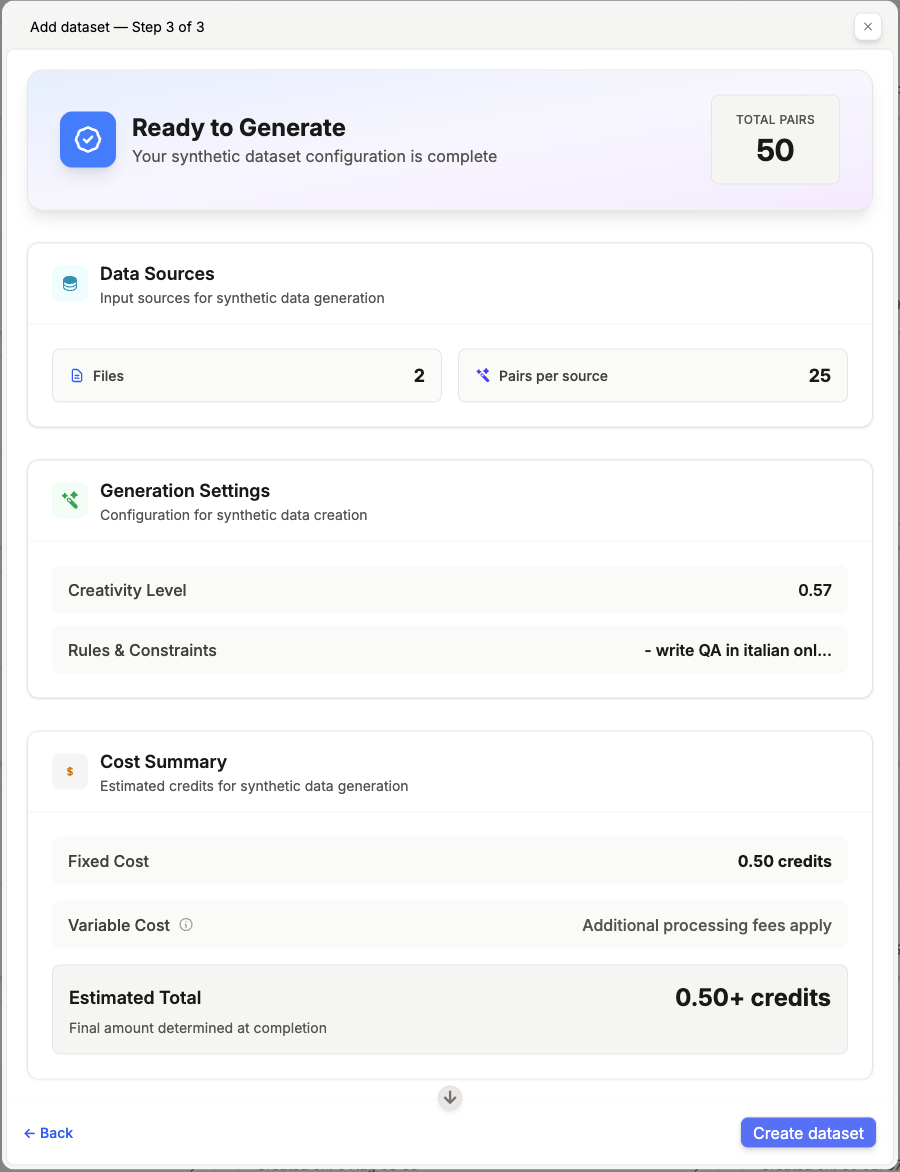
Review your configuration summary:
* Data sources and expected output count
* Generation settings and estimated cost
Click **Generate Dataset** to start the process.
**Project Name**: Choose a descriptive name that reflects your use case
**Project Goals**: Add context about your project goals
**Follow-up Questions**: Answer some questions about your project
## Step 2: Create and Handle Dataset
You have **two paths** for dataset creation. Choose the one that fits your situation:
### Path A: Upload Existing JSONL Dataset
Upload your existing dataset in JSONL format.
* **Dataset Name**: Enter a descriptive name
* **Upload File**: Select your properly formatted JSONL file
* **Validation**: The system will automatically validate your dataset format
Need help with JSONL format? See our [Datasets Overview](/datasets/overview) for detailed formatting requirements.
### Path B: Generate Synthetic Dataset
Generate synthetic dataset from your content (PDFs, web pages, youtube videos)
Select your input sources for synthetic dataset generation:
* **Files**: PDF, DOCX, TXT, HTML, PPTX
* **YouTube Videos**: Individual videos or playlists
* **Web URLs**: Website content extraction
* **Mixed Sources**: Combine multiple input types
**QA Pairs per Source**: Set how many question-answer pairs to generate from each input
**Rules & Constraints**: Define generation requirements
```text theme={null}
- Focus on technical accuracy
- Use domain-specific terminology
- Maintain consistent formatting
- Generate questions of varying complexity
```
**Question Format**: Guide question structure
```text theme={null}
Summarize the blog post titles {blog_title} in 5 bullet points.
{blog_post}
```
**Answer Format**: Define expected answer style
```text theme={null}
{bullet_list}
```
You can also provide QA Examples to better steer the synthetic data generation.
**Creativity Level**: Adjust generation diversity (0-100)
For structured outputs (like JSON extraction), set creativity to 0. For conversational models, use 30-50.
Review your configuration summary:
* Data sources and expected output count
* Generation settings and estimated cost
Click **Generate Dataset** to start the process.
 ### Snapshot Creation
Regardless of which path you chose (upload or synthetic generation), you need to create a snapshot:
Browse through the QA pairs inside the dataset to ensure quality and relevance.
Autosplit the dataset into training and validation split. If you find challenging QA pairs that could be a good test case during evaluation, manually select them and place them in validation set.
Create a snapshot of your dataset for fine-tuning:
* **Snapshot Name**: Give it a descriptive name
* Click **Create Snapshot** to finalize
Give a descriptive name to the snapshot, useful for versioning and easier experiment tracking.
## Step 3: Fine-tune Your Model
Start by creating a fine-tuning job:
* **Job Name**: Give your fine-tuning job a descriptive name
The system will analyze your dataset automatically:
* **Data Quality Assessment**: Checks for formatting and consistency
* **Content Analysis**: Analyzes patterns and complexity
* **Recommendations**: Suggests optimal training models and parameters
This analysis typically takes 2-5 minutes and helps optimize your training configuration.
Based on the analysis, the system returns a set of recommended experiments.
Start the fine-tuning process:
* **Experiment Selection**: Choose which experiments to run
* **Monitor Progress**: Track training progress in real-time
* **Compare Results**: View performance across different configurations
Fine-tuning duration varies from 30 minutes to several hours depending on dataset size, model complexity, and chosen parameters.
## Step 4: Define Metrics
Before evaluating your model, define the metrics that will measure success for your specific use case:
Describe your evaluation needs and let our AI generate the rules for you.
Provide:
* **metric name**
* **metric description**
Our AI will generate a set of **should follow** and **should not follow** rules.
Accept/Update/Delete the previously generated rules to actually create the metric.
Well-defined metrics are crucial for meaningful evaluation. Take time to think about what "success" looks like for your specific use case. Learn more in our [Evaluation Metrics Guide](/evaluations/metrics).
## Step 5: Evaluate Your Model
Select the metrics you want to use for evaluation:
* **Your Custom Metrics**: The metrics you defined in the previous step
* **Available Metrics**: Pre-built metrics from the Prem library
Begin the evaluation process on the validation split, by using the previously defined metrics.
Analyze the results to understand model performance:
* **Metric Scores**: See how each model performed on each metric
* **Detailed Breakdowns**: Examine individual response quality
* **Identify Weaknesses**: Find areas where models need improvement
Evaluation typically takes 5-15 minutes depending on test dataset size. Learn more about evaluation strategies in our [Evaluations Guide](/evaluations/get-started).
## Project Complete
Congratulations! Your project is now complete. You have:
* ✅ **Created or uploaded a quality dataset**
* ✅ **Successfully fine-tuned your model**
* ✅ **Defined custom metrics for your use case**
* ✅ **Validated performance through evaluation**
* ✅ **Generated a production-ready AI model**
### Next Steps
Learn how to deploy your fine-tuned model for production use.
Integrate your model into applications using our API.
Run experiments to further optimize your model.
### Snapshot Creation
Regardless of which path you chose (upload or synthetic generation), you need to create a snapshot:
Browse through the QA pairs inside the dataset to ensure quality and relevance.
Autosplit the dataset into training and validation split. If you find challenging QA pairs that could be a good test case during evaluation, manually select them and place them in validation set.
Create a snapshot of your dataset for fine-tuning:
* **Snapshot Name**: Give it a descriptive name
* Click **Create Snapshot** to finalize
Give a descriptive name to the snapshot, useful for versioning and easier experiment tracking.
## Step 3: Fine-tune Your Model
Start by creating a fine-tuning job:
* **Job Name**: Give your fine-tuning job a descriptive name
The system will analyze your dataset automatically:
* **Data Quality Assessment**: Checks for formatting and consistency
* **Content Analysis**: Analyzes patterns and complexity
* **Recommendations**: Suggests optimal training models and parameters
This analysis typically takes 2-5 minutes and helps optimize your training configuration.
Based on the analysis, the system returns a set of recommended experiments.
Start the fine-tuning process:
* **Experiment Selection**: Choose which experiments to run
* **Monitor Progress**: Track training progress in real-time
* **Compare Results**: View performance across different configurations
Fine-tuning duration varies from 30 minutes to several hours depending on dataset size, model complexity, and chosen parameters.
## Step 4: Define Metrics
Before evaluating your model, define the metrics that will measure success for your specific use case:
Describe your evaluation needs and let our AI generate the rules for you.
Provide:
* **metric name**
* **metric description**
Our AI will generate a set of **should follow** and **should not follow** rules.
Accept/Update/Delete the previously generated rules to actually create the metric.
Well-defined metrics are crucial for meaningful evaluation. Take time to think about what "success" looks like for your specific use case. Learn more in our [Evaluation Metrics Guide](/evaluations/metrics).
## Step 5: Evaluate Your Model
Select the metrics you want to use for evaluation:
* **Your Custom Metrics**: The metrics you defined in the previous step
* **Available Metrics**: Pre-built metrics from the Prem library
Begin the evaluation process on the validation split, by using the previously defined metrics.
Analyze the results to understand model performance:
* **Metric Scores**: See how each model performed on each metric
* **Detailed Breakdowns**: Examine individual response quality
* **Identify Weaknesses**: Find areas where models need improvement
Evaluation typically takes 5-15 minutes depending on test dataset size. Learn more about evaluation strategies in our [Evaluations Guide](/evaluations/get-started).
## Project Complete
Congratulations! Your project is now complete. You have:
* ✅ **Created or uploaded a quality dataset**
* ✅ **Successfully fine-tuned your model**
* ✅ **Defined custom metrics for your use case**
* ✅ **Validated performance through evaluation**
* ✅ **Generated a production-ready AI model**
### Next Steps
Learn how to deploy your fine-tuned model for production use.
Integrate your model into applications using our API.
Run experiments to further optimize your model.